Chapter 2. Desktop App Setup and First Session — Install and Sign In, the Code Tab, Picking a Folder, and Your First Task
Required Read this to follow this stage.One-line summary: Install the Claude desktop app and open the Code tab. In the bar below the input box, pick a folder, type what you want done in everyday words, and Claude will work inside that folder. In this chapter, you will have Claude turn one messy meeting note into meeting minutes in a format you choose. This is the first step toward the "personal organizer tool" you will build throughout Stage 3.
This chapter is based on the Claude Code official docs checked on October 31, 2026, and the macOS desktop app (Korean interface, paid account). Screen labels change often. If your screen looks different, follow the labels you see on your screen.
Install and Sign In
Claude Code is built right into the Claude desktop app. You only need to install the app. You do not need to install any other programs (like Node.js, a developer tool for running code, or the terminal version of Claude Code) separately.[1]
- Download the right installer for your computer from the official setup page.[1:1]
- macOS: A single file works on both Intel and Apple Silicon Macs.
- Windows: There is a standard installer for most PCs (x64) and a separate one for ARM64 PCs.
- Linux: Currently in beta (test version). There is a version for Ubuntu and Debian.[2]
- Run the downloaded file to install the app.
- Open the app and sign in with your Anthropic account.[1:2] If you have a personal subscription (Pro, Max, or Ultra), sign in with the same account you use on claude.ai.[3]
If you already installed the Claude app in Stage 2, you can skip this step. If your app is old, update to the latest version first. On macOS, click Claude → Check for Updates… (업데이트 확인…) in the menu bar; on Windows, click Help → Check for Updates….[4]
Quick check
You want to use Claude Code in the Claude desktop app. What else do you need to install besides the app?
Open the Code Tab
Claude Code lives in the Code tab at the top of the app's side menu.[1:3] If the tabs only show icons, hover your mouse over them to see their names.[1:4] On macOS, you can also go to Go → Code (이동 → Code) in the menu bar.
If a message pops up when you click Code, here is what to do.[1:5]
- A prompt to upgrade to a paid plan: You need a paid subscription to use Claude Code (Chapter 1). Subscribe first, then open it again.
- A prompt to sign in online: Finish signing in and restart the app.
If you see an error called "403"
A 403 error means access was denied. Check the authentication troubleshooting guide in the official docs.
When you open a new session in the Code tab, you will see a screen like this.
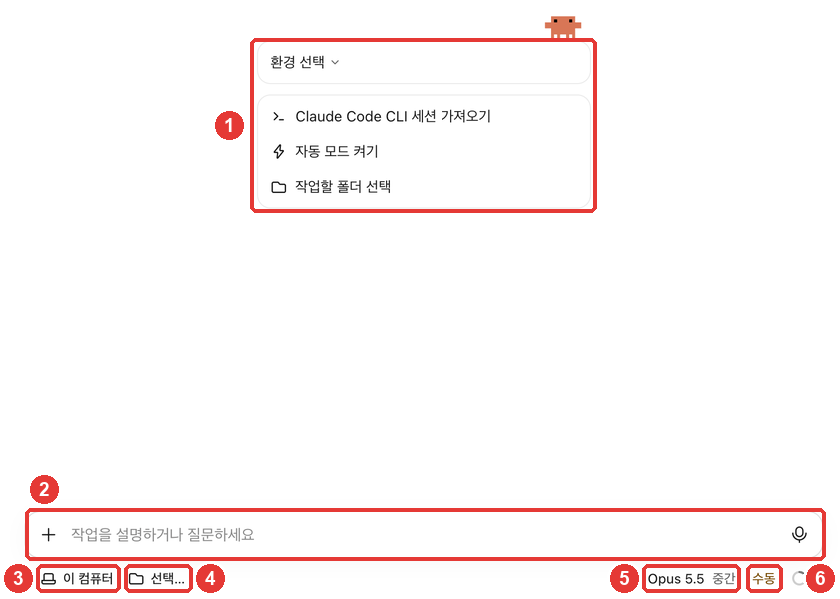
The spot you will look at most while working is the bar below the input box. The official docs also tell you to choose the environment, folder, permission mode, and model in this row before sending your first message.[5]
| Number | Screen Label | What It Does |
|---|---|---|
| ① | Getting-started cards | Shown only in a new session. You do not need to use them right now |
| ② | Input box | Where you type and send what you want done |
| ③ | This computer (이 컴퓨터) | Where Claude will work (environment). Leave it as is to work on your computer |
| ④ | Select… (선택…) | Which folder Claude will work in |
| ⑤ | Opus 5.5 · Medium (중간) | Which model to use and how deeply it should think |
| ⑥ | Manual (수동) | What Claude is allowed to do without asking first (permission mode) |
Source: Screen labels verified in this guide (2026-10-31); roles from official docs[5:1]
For ③, leave the environment set to This computer (이 컴퓨터) at first.[6] We will cover working in the cloud in Chapter 8.
You can also change the model (⑤) later.[1:6] At first, you can just keep whatever is already selected on your screen.
If, unlike the screenshot, your screen has "Choose environment (환경 선택)" above the input box, you have the earlier screen layout. Only the position is different and the job is the same, so find the item with the same name and pick it.[1:7]
If "Choose environment (환경 선택)" is above the input box and there is no environment in the bottom bar
You have the earlier screen layout. The official docs note that if a new session does not show an environment under the input box, you are seeing the earlier layout.[1:8] In the earlier layout, you pick the environment and folder above the input box, and the permission mode and model in the bar below it.[7] They do the exact same job.
Quick check
Before sending your first request in the Code tab, where do you pick your working folder, permission mode, and model?
Prepare and Pick a Practice Folder
Claude Code works inside the folder you pick. That is why it is best to start by making a separate practice folder that you do not mind messing up. The official docs also recommend starting with a small project you know well.[1:9]
Practice materials: One week of notes from Seoyeon, a staff member at a small shop called "Corner Cafe" (all fictional). You will only use the one meeting note in this chapter and save the rest for later chapters.
| File | Contents |
|---|---|
| meeting-2026-10-27-weekly.txt | Messy weekly meeting notes |
| study-2026-10-28-prompt-lecture.txt | Lecture notes from a class |
| review-2026-10-29.txt · 10-30 · 10-31 | Three days of daily reflections |
The dates and days of the week in these notes were made up for the story, so they do not match the real 2026 calendar. When you check the results, see if they match the dates and days written in the notes.
- Create a new folder named organizer (organizer tool) on your computer, and create an inbox folder inside it. You do not need to create the notes folder for the results ahead of time. In this guide's practice run, Claude created it when saving.
- Download the 5 files above and put them inside inbox.
- Click Select… (선택…) (④) in the bar below the input box in the Code tab.
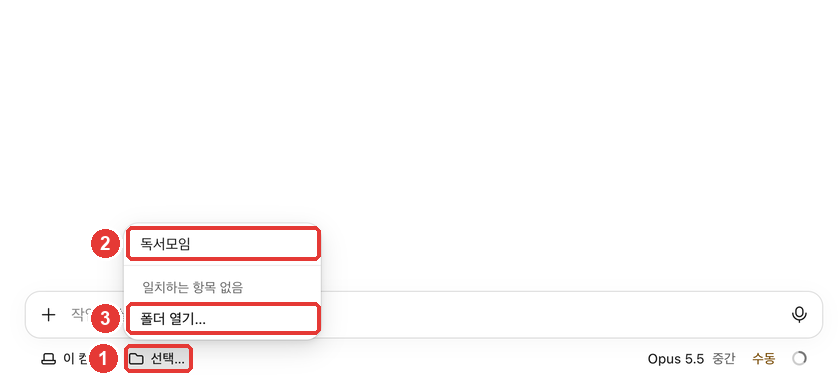
- When the menu opens, click Open folder… (폴더 열기…) (③) at the very bottom.[1:10]
- In the file picker window, choose the organizer folder and click Open (열기).
The top of the menu shows recently opened folders. Once you have opened a folder, next time you can type its name into the search box (②) to pick it right away. A brand-new folder will say "No matching items (일치하는 항목 없음)" like in the screenshot, so use Open folder… the first time.
Once you pick a folder, its name appears in spot ④.
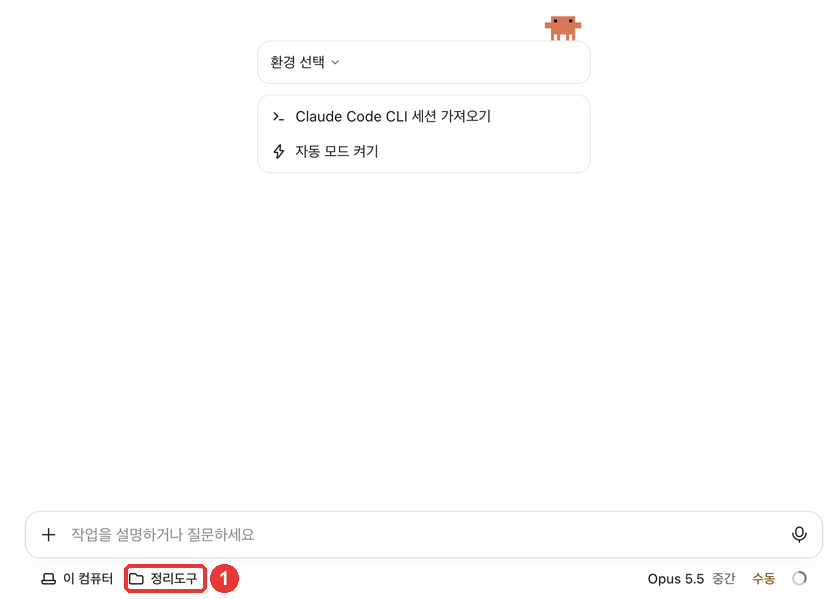
Think of the working folder as the boundary of what Claude can touch. That is why it is much safer to pick a small folder holding only the files for your current task rather than a big folder containing all of your documents.
Quick check
You are giving Claude Code a task for the first time. Which folder is the safest choice?
Give Your First Task
Now type what you want done and send it. The steps are the same as in the official docs. Type what you want Claude to do and press Enter, and Claude will read and edit files in the folder and run commands.[5:2]
Let's compare a weak request and a better request side by side.
Organize the meeting notes.Read the meeting notes in the inbox folder and organize them into meeting minutes. Split them into three sections: Decisions / Action Items (owner and due date) / Next Topics to Discuss, and save the result as a new file in the notes folder. Do not change the original note.The second request includes what to read, what format to use, where to save it, and what not to touch. When you specify the format, the result comes out consistent every time, and it is much easier to check if it is right. You are applying the "specify the format" rule from Stage 1 directly to folder work (Stage 1, Chapter 4).
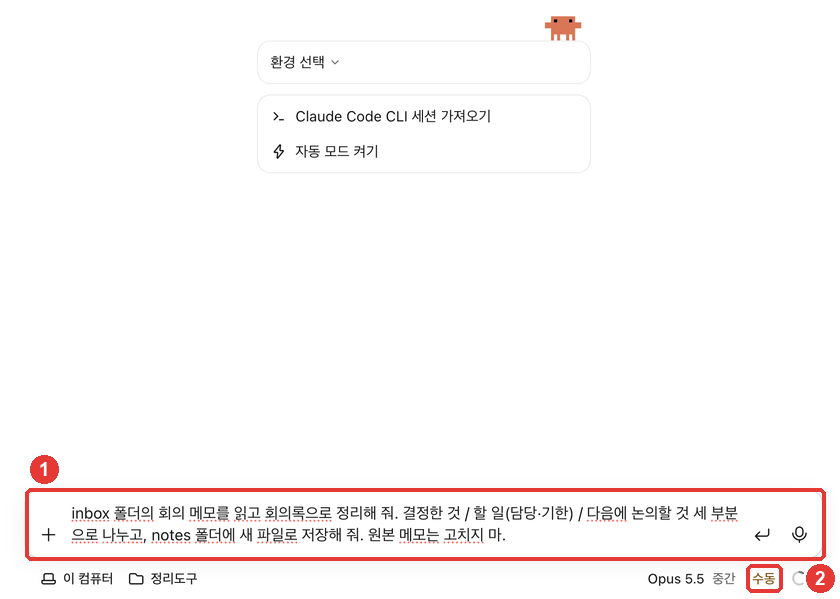
After you send it, the screen shows what Claude is doing line by line. Sometimes it even creates a to-do list—like "Read notes → Write meeting minutes → Verify original is untouched"—and checks off each step as it goes.
You can step in while it is working. Click the stop button to stop it right away, or type a correction and press Enter to send your note without stopping what it is doing.[5:3] For example, if you add "Put the action items in a table," Claude will apply that starting from the next step.
When Claude Asks for Permission
When the permission mode is set to Manual (수동), Claude asks you first before editing a file or running a command. It shows you what will change, and you can approve or reject each change one by one.[8] At first, it is safest to leave it on Manual and watch what it wants to do step by step. We will cover permission modes in detail in Chapter 4.
Even in Manual mode, Claude may create a file right away without asking. It is not broken. If you have used Claude Code in the terminal before, the settings you chose back then might also apply to the app. The screenshots in this guide were also taken on a computer with such settings, so there is no permission prompt. The box below explains how this works.
If it is set to Manual, why did Claude create the file right away without asking?
If you have used Claude Code in the terminal before, the settings you chose back then might also apply to the desktop app. The desktop app reads the same settings files as the terminal version of Claude Code.[8:1] For example, if you added an allow rule like "Do not ask before writing files," Claude will do that without asking even in Manual mode. The screenshots in this guide were taken on a computer with those settings, so no permission prompt appeared.
Quick check
Your permission mode is set to "Ask permissions" (Manual). When Claude tries to create a meeting notes file, what usually happens?
Check the Result
When the job is done, Claude shows a summary of what it did.
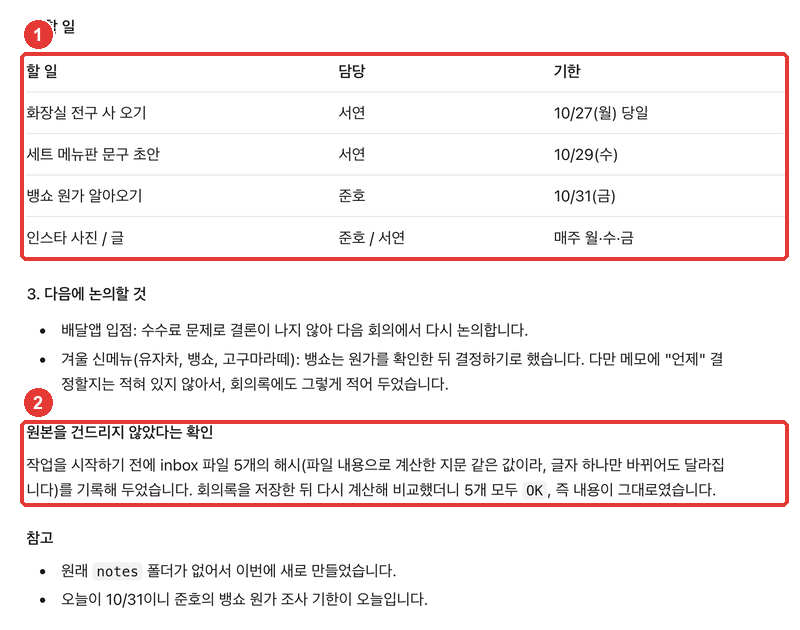
Even when Claude says "all done," check it yourself. Open the original note next to the result and ask yourself these questions.
- Does every action item have an owner and due date? Do they match the note?
- Do the numbers (prices and dates) match the note?
- Did it make up anything that was not in the note?
- Is the original note untouched?
Here is how the meeting minutes generated for this guide compared against the original note.
| Written in the Note | In the Meeting Minutes |
|---|---|
| Coffee + cookie set 5,500 won, try for 2 weeks / hold off on discount | Copied as is |
| Junho cost calculation by Friday / Seoyeon sign wording by Wednesday / Seoyeon light bulb today | Added calendar dates: 10/31 (Fri), 10/29 (Wed), and 10/27 (Mon, same day) |
| Decide on new menu item after seeing cost | Explicitly noted: "The note does not state when this will be decided" |
| Next meeting Mon 11/3 at 10 AM | Copied as is |
Source: Practice run for this guide (2026-10-31). Result file: ch2-minutes-2026-10-27-weekly.txt (kept in Markdown format)
Even with the exact same request, the result will vary slightly each time. It is totally fine if the table style or wording looks different from this guide. As long as you can answer "yes" to all four check questions above, it went well.
The new file is saved in the organizer/notes folder on your computer. Open it in Finder or File Explorer to take a look. In Chapter 3, we will see how to view files and changes right inside the app.
Quick check
Claude says it has finished creating the meeting notes. What is the very first thing you should do?
Try It Yourself
- Create the organizer folder and put the 5 practice files inside inbox.
- Open a new session in the Code tab and pick organizer as your folder.
- Send the "better request" from above as is, then check the resulting meeting minutes using the 4 check questions.
- If there is something you want changed, ask Claude to fix it in one sentence (for example: "Add a 'Status' column to the action items table").
Follow-up challenge: If you have your own meeting notes or class notes, remove any personal information, drop one file into inbox, and send the same request. Feel free to adjust the sections (Decisions, Action Items, Next Topics) to fit your work. Starting in Chapter 3, you will keep using this folder.
Summary
- Claude Code lives in the Code tab of the Claude desktop app. Just install the app and sign in with your Anthropic account.
- In the bar below the input box, pick the environment (This computer), folder, model, and permission mode.
- Start by picking a small practice folder. The working folder is the boundary of what Claude can touch.
- In your request, include what to read, the format, where to save it, and what not to touch.
- Do not just take Claude's word that it is "all done"—compare the result against the original. Results vary slightly each time.
Key Terms
| Term | One-line meaning |
|---|---|
| Session | One working conversation with Claude inside an open folder |
| Environment | Where Claude works, such as your computer (This computer) or the cloud |
| Local | Your computer. Shown on screen as "This computer (이 컴퓨터)" |
| Permission mode | How much Claude is allowed to do without asking first |
| Manual | The mode where Claude asks every time before editing files or running commands |
Finished this chapter?
Progress is saved only in this browser. See your progress on the full table of contents.
Next chapter: Chapter 3. Touring the Screen
References (8)
Claude Code official docs, "Get started with the desktop app". "Universal build for Intel and Apple Silicon" / "apt or .deb for Ubuntu and Debian" / "For Windows ARM64, download the ARM64 installer. On Linux, install with apt" / "sign in with your Anthropic account." / "Click the Code tab at the top of the sidebar. If the tabs show only icons, hover over one to see its name." / "Prompt to upgrade: you need to subscribe to a paid plan first" / "Prompt to sign in online: complete the sign-in and restart the app" / "The desktop app includes Claude Code, so you don't need to install Node.js or the CLI to use the Code tab." / "click the first control, the environment selector, and select the top entry in the Local group. Then click the project folder control beside the environment selector, select Open folder…, and choose your project's directory." / "If a new session shows no environment under your prompt box, you have the earlier layout." / "Start with a small project you know well." / "You can change the model later from the model picker." code.claude.com (checked on 2026-10-31) ↩︎
On Linux, you install it with apt (a tool for installing programs on Linux). See the official docs, "Get started with the desktop app". code.claude.com (checked on 2026-10-31) ↩︎
Claude Code official docs, "Authentication". "Claude Pro, Max, or Ultra subscription: log in with your claude.ai account." code.claude.com (checked on 2026-10-31) ↩︎
Claude Code official docs, "Desktop application". "Open Claude > Check for Updates… on macOS or Help > Check for Updates… on Windows to update." code.claude.com (checked on 2026-10-31) ↩︎
Claude Code official docs, "Desktop application". "Before you send your first message, choose the environment, project folder, permission mode, and model in the row under the prompt box" / "Type what you want Claude to do and press Enter to send. Claude reads your project files, makes changes, and runs commands based on your permission mode." / "click the stop button to interrupt immediately, or type a correction and press Enter to send it without stopping the running action." code.claude.com (checked on 2026-10-31) ↩︎
The official docs call this item "Local" (your computer). "Open folder… (폴더 열기…)" in the folder menu is "Open folder…" in the official docs. code.claude.com (checked on 2026-10-31) ↩︎
Claude Code official docs, "Desktop application". "In the earlier layout, choose the environment and any project folder or repository above the prompt box, and the permission mode and model in the row under it." code.claude.com (checked on 2026-10-31) ↩︎
Claude Code official docs, "Desktop application". "Claude asks before editing files or running commands. You see a diff and can accept or reject each change." / "The desktop app reads the same settings files as the CLI." code.claude.com (checked on 2026-10-31) ↩︎